 |
This section begins the discussion of how to effectively use the selection tools presented in this chapter. The full story, however, won't be completed until we cover masks in Chapter 4.
This chapter has presented the six selection tools from the Toolbox as well as the By Color selection tool. This leaves you with quite a few choices. So, the question naturally arises, ``Which is the best tool to use?'' This section summarizes the tools discussed so far and describes their strengths and weaknesses.
The order of the summary is from the most useful selection tool to the least:
The Bezier Path selection tool is not, however, a panacea. When the selection subject's boundary is not smooth, it is impractical to use the Bezier Path tool. Examples of difficult selections with this tool would be the image of a leafy tree or one of a woman's hair blowing in the breeze. For these types of selections, other approaches are necessary (see Chapter 4).
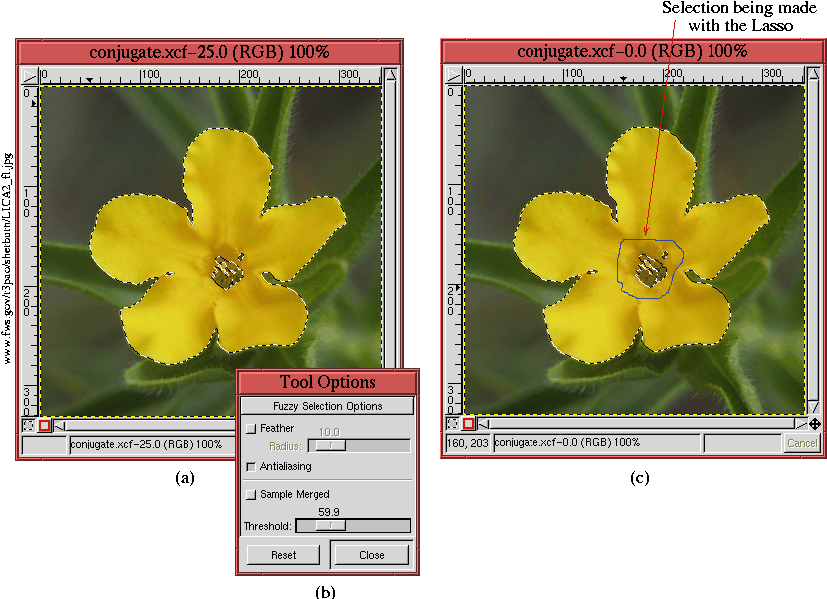
Often a selection is most efficiently made using a combination of tools. For example, beginning a selection with the Magic Wand or with By Color can produce a result that is almost right but may be missing a component or may have included an unwanted element. When this happens, the Lasso can often be used to correct the problem.
Figure 3.25(a)
Although the Magic Wand could not select all the desired parts of the flower, the remainder can be added to the selection using the Lasso. Figure 3.25(c) shows the process of making a selection with the Lasso. Pressing the Shift key before clicking and dragging in the image window causes the new selection to be added to the one created by the Magic Wand. The Shift key needs to be released before the selection is finished. Adding selections was described in Section 3.2. Notice that under these circumstances the selection made with the Lasso need not be precise, which corresponds to the guidelines given for the Lasso in Section 3.5.1.
The example of conjugating tools presented here is a little contrived because it is not often that the Magic Wand can be used practically in this way. But it is illustrative of how the tools can be used together. We will see much more of this in Chapters 4 and 7 where the Threshold tool takes the place of the Magic Wand.
One of the most useful tools that can be used in conjunction with the Bezier Path selection tool is the Zoom tool, found in the Toolbox and in the Image:View menu. This tool was covered in some detail in Section 1.8.1; however, its value for aiding selections is emphasized here.
When attempting to perform a precise selection of a subject, it is
essential to get in close to the pixels.
Figure 3.26(a)
Figure 3.26(b) is a 400% zoom of Figure 3.26(a). As can be seen the control point of the Bezier path located at the junction of the right wing and the fuselage is not quite correctly positioned. It is only through the use of Zoom that such a careful examination of the selection can be made. It is quite easy to improve the positioning of the control point using the Edit Point mode button in the Paths dialog.
Although the Zoom tool was used in Figure 3.26(b) to verify a Bezier path, it is often a good strategy to draw the path from the start in a zoomed window. A useful tool for helping with this is the Navigation Window, found in the Image:View menu. Figure 3.26(c) illustrates this tool, which consists of a thumbnail of the image with a panning rectangle superimposed on it. This panning rectangle shows the part of the image that can be viewed in the zoomed image window. The panning rectangle can be dragged with the left mouse button, and this makes the image in the zoomed window move in tandem with it. In addition to the panning function of the Navigation Window it also contains + and - buttons, which can control the amount of zoom applied to the image window.
The image window guides (see Section 2.6.1) can be used to
accurately positioning a selection made with the Ellipse Select
or Rectangle Select tools. An example of the former is
illustrated in Figure 3.27.
Choosing the Ellipse Select tool from the Toolbox, the selection is begun by clicking and dragging from the intersection of the two guides. If the Snap to Guides checkbox in the Image:View menu is toggled on, the initial point for the selection snaps to the guides' intersection. Because the guides are tangent to the clock's perimeter, dragging the mouse until the selection touches the two tangent points perfectly completes the selection.