 |
A common graphical device on the Web is the clickable image map. A clickable image map is a graphic that has multiple hyperlinks, and, perhaps, Java scripts, associated to a single image. Such an image allows the Web designer to associate links and dynamic actions to graphical cues.
As an example, one use of a clickable image map might be for a travel agency offering vacation packages to different exotic locations around the world. A clickable image map of the world could be constructed to contain hyperlinks cued to the location of a mouse click on the map. For example, clicking on France might send the user to another web page giving details of vacation packages, sites to see, places to stay, and restaurants to try when visiting Paris. Clicking on Venezuela would send the user to pages on Caracas, and so on.
Clickable image maps are very useful devices for the Web because they represent an alternate, graphical means of navigating to other pages. One problem, however, is that they can be difficult to construct. For each hyperlink, a region of the image must be defined that activates the link when the mouse is clicked in it. This region is defined by a polygon, which in turn is specified by a set of pairs of coordinates giving the locations of the polygon's vertices. The difficulty comes from trying to determine the coordinate values. For an image map containing many hyperlinks associated to complicated regions, the task of assembling these points can be quite arduous.
Fortunately, the ImageMap plug-in, found in the Image:Filters/Web menu, allows you to graphically input the vertices of polygonal regions by drawing directly on the image. The plug-in also allows you to easily assign hyperlinks and Java scripts to the regions. When finished, the plug-in automatically writes the HTML file that displays the newly created image map. All the positional information about vertices for the map regions is written into this file along with the hyperlinks and references to the Java scripts associated with the regions.
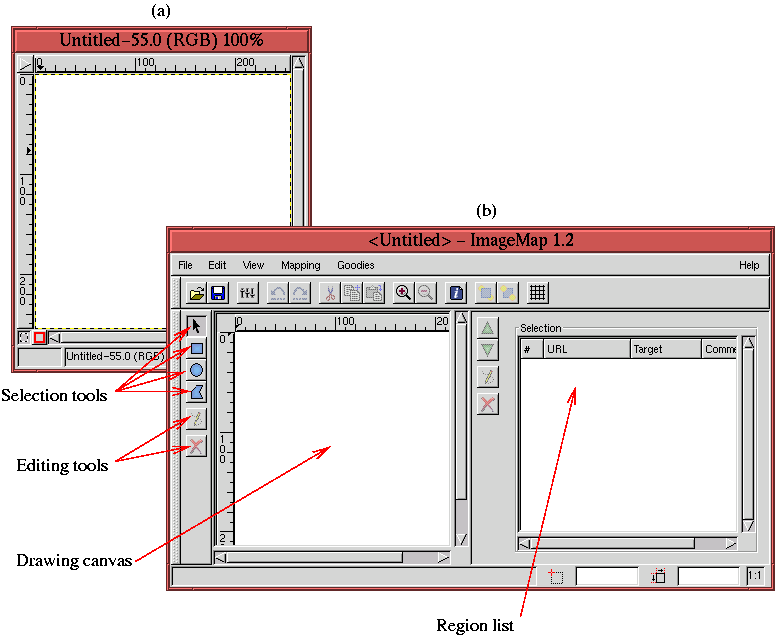
The initial description of how the ImageMap plug-in works is
based on the blank image shown in
Figure 9.13(a).
The ImageMap selection tools are used to define the clickable
regions. The selection tool choices are rectangular, circular, and
polygonal. Of the three, the polygon tool is the most general because
it allows for the most complex shapes to be selected.
Figure 9.14(a)
As soon as an area like the polygon in Figure 9.14(a) has been defined, the Settings dialog appears as shown in Figure 9.14(b). This is used to specify the hyperlink associated to the selected area. As you can see from the dialog, any valid Web link can be specified. In this example, the text https://www.gimp.org has been entered as the link. In addition, informational text has been added to the Comment field at the bottom of the dialog. The Settings dialog allows the polygon to be edited and Java scripts to be associated with the selected area. These functionalities are accessed by clicking on the relevant tabs shown in the dialog.
Figure 9.15(a)
As seen in Figure 9.15(a), the points of the active region are displayed as red squares. It is possible to insert, delete, or move these points. Choosing the Arrow icon from the selection tools, any point can be moved by clicking and dragging it. A point can be deleted by right-clicking it, which brings up the menu shown in Figure 9.15(b). A point can be added to a line segment by right-clicking it, which brings up the menu shown in Figure 9.15(c).
After all the desired areas have been selected and hyperlinks defined, you can save the work by clicking on the floppy disk icon or selecting the Save As function from the File menu. This brings up a dialog that allows a file name to be entered. This should be a file whose extension ends in .html or .htm.
A more realistic example of the ImageMap plug-in's use is
illustrated with the image shown in
Figure 9.16(a).
<IMG
SRC="/home/cbunks/PROJECTS/GIMP/BOOK/08-WEB_CENTRIC/Figures/southeast-usa.gif"
WIDTH=482 HEIGHT=428 BORDER=0 USEMAP="#">

<MAP NAME="">
<!-- #$-:Image Map file created by GIMP Imagemap Plugin -->
<!-- #$-:GIMP Imagemap Plugin by Maurits Rijk -->
<!-- #$-:Please do not edit lines starting with "#$" -->
<!-- #$VERSION:1.1 -->
<!-- #$AUTHOR:Carey Bunks -->

<AREA SHAPE="POLY" COORDS="6,91,10,178,21,183,21,195,98,195,113,144,128,
107,113,104,120,92" HREF="https://www.good-travel.com/arkansas.html">

<AREA SHAPE="POLY" COORDS="21,197,21,234,32,252,22,291,49,292,69,299,75,
295,101,312,117,307,131,308,150,312,142,298,120,281,138,276,130,255,83,253,
100,197" HREF="https://www.good-travel.com/louisiana.html">

<AREA SHAPE="POLY" COORDS="119,136,172,135,174,276,140,277,132,255,85,253"
HREF="https://www.good-travel.com/missouri.html">

<AREA SHAPE="POLY" COORDS="119,136,269,127,288,106,334,74,168,83,170,88,
136,93" HREF="https://www.good-travel.com/tennessee">

<AREA SHAPE="POLY" COORDS="139,91,170,90,170,81,285,75,319,43,295,28,293,12,
274,18,251,4,243,4,243,12,232,18,218,39,209,33,186,48,171,46,157,65,145,68"
HREF="https://www.good-travel.com/kentucky.html">

<AREA SHAPE="POLY" COORDS="173,272,200,271,190,248,261,247,261,208,235,130,
170,133" HREF="https://www.good-travel.com/alabama.html">

<AREA SHAPE="POLY" COORDS="237,132,263,213,266,254,342,255,342,245,357,247,
367,207,305,139,292,135,296,126" HREF="https://www.good-travel.com/georgia.html">

<AREA SHAPE="POLY" COORDS="300,127,296,133,365,205,420,146,388,120,357,122,351,
113,317,117" HREF="https://www.good-travel.com/south-carolina.html">

<AREA SHAPE="POLY" COORDS="333,74,270,124,304,124,314,117,354,112,360,120,386,
120,423,145,433,145,440,127,465,111,459,97,479,78,468,60"
HREF="https://www.good-travel.com/north-carolina.html">

<AREA SHAPE="POLY" COORDS="195,253,198,271,227,271,257,288,284,275,318,303,
328,303,329,345,347,365,360,395,388,416,404,410,408,367,385,317,355,249,342,
248,342,259,335,259,335,255,266,256,259,249"
HREF="https://www.good-travel.com/florida.html">

</MAP>
As you can see, each of the areas defined in the ImageMap dialog is specified by an AREA hypertext markup tag. This tag contains the coordinates of the polygon region and the text of the associated hyperlink. The example described above can be viewed as an HTML document by clicking here. HTML files created with ImageMap can be reloaded and edited by the plug-in. Normally, this is done by reloading the original image into the GIMP, running the ImageMap plug-in on the image, and then loading the saved imagemap file using the Open command from the plug-in's File menu. Figure 9.17
As a final note, with a Web browser, you can open the HTML file
created by ImageMap to verify that it is working correctly. If
necessary, you can edit the HTML file directly with a text editor.
Figure 9.18
The ImageMap plug-in has many other features. This book is not the appropriate place to cover this plug-in in detail. However, most of the features are not difficult to discover, and you should be able to determine their use with a little experimentation.